

 |
 |
 |
||||

Contents: How To, Main Page
Step 6 What good is it to have a job where you get to annihilate entire planets at the push of a button when you can't phone a friend and tell them to watch the night sky for a few fireworks? Lets establish some helmet communications in the form of an attached and internal communications box.
Image 12 (Com Box Preparation) Alrighty then... ...the Death Star wasn't built in a day, and its very doubtful you will complete this helmet in one day as well. You're making good progress, so stick with it. At this phase of the build you need to prepare the com box for its fit to the dome. Everyone that I know of who wears a Gunner helmet has their com box mounted on the left side of the helmet; did you know that in the Return of the Jedi, LFL used reversed film footage to change perspective when the "New and Improved" Death Star was attacking the rebel fleet? Click the photo below to see the image. This is an actual screen cap without photo editing trickery!
I highly encourage you to put yours on the left side, just to avoid the comments of, "Look, he put his thingy on the wrong side."
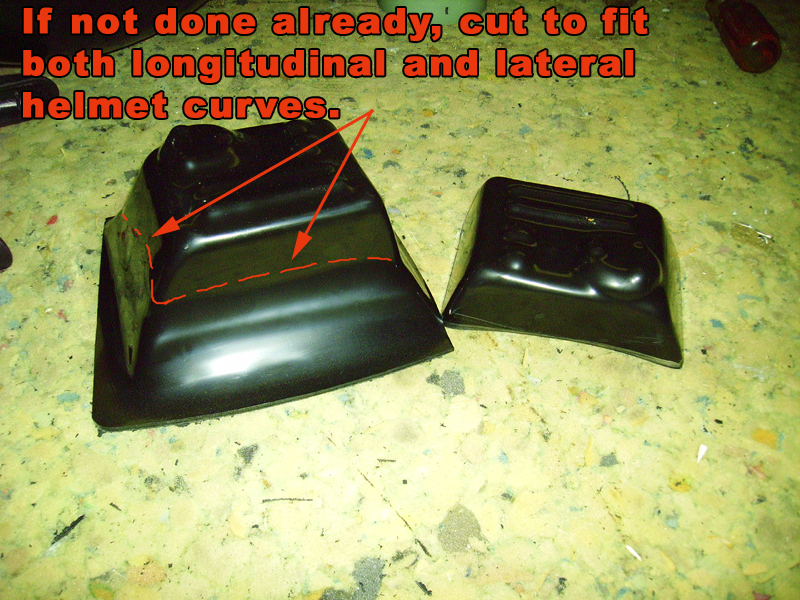
Back to business. Trim down the rough box to achieve the curvature desired, meeting the need for both the vertical and horizontal curve of the helmet.

Image 13 (Com Box Preparation) cont. With trial and error, I have found that the easiest way to mount the box to the dome is with screws. In order to do this we need something to screw the screws into. Wood works and is fairly lightweight. Ensure the wood is not so thick that the com box will not set flush up against the helmet dome. You should be left with a 1/4" gap between the face of the wooden block and the edge of the com box lip where it meets the helmet. I highly recommend Gorilla Glue for this step. First, rough up inside area of the com box with 180 grit sandpaper and clean the surface. No need to rough up the wood, this adhesive will penetrate the wood with ease. That is what it was formulated to do. Now run the block of wood under some water. Yep, you read that correctly. This adhesive works best when the wood is dampened. It swells the wood and helps activate the adhesive, then when the water evaporates, the glue fills in the voids. REALLY GOOD STUFF!!! I almost forgot to mention, this stuff expands considerably, don't overdo it. Don't be afraid to use it though, everything will be hidden behind the box. Let it cure overnight before continuing.

Image 14 (Com Box Preparation) cont. The antenna is a straight forward process that should not pose you any troubles. Simply drill a 1/8" hole in the rear of the box near the outside edge at the back of the box. DO make sure the hole is drilled in line with the vertical lines on the box and not lined up with the lower left round raised portion. The photo below will illustrate.

Image 15 (Com Box Preparation) cont. Cut yourself an 11" piece of 1/8" steel rod and bend to fit the com box as shown in the image above and below. Round the edge of the long portion of the antenna to prevent injuries and achieve a more pleasing or finished appearance. Insert the short portion of the rod into the hole on top of the com box and rotate or feed the rod through. Slide the rod down and place the short shaft under the wooden block. Apply a generous amount of the aforementioned Gorilla Glue along the rod on both the short portion and the long portion. NOTE: DO NOT glue all the way to the top of the box where the rod enters the com box. Remember, this stuff expands and it will extrude through the hole and onto the top of the com box itself.

Again, let this stuff dry overnight for a secure bond.